
Price transparency has become one of the most important and most challenging requirements in modern healthcare. Providers increasingly want to collect payment up front for a number of reasons, including:
- Cash flow: Pre-service payments reduce days in A/R and write-offs
- Regulation: Federal and state rules now require clearer, earlier patient cost information
- Patient experience: Consumers expect retail-like clarity around cost before committing to care
To support this, providers need a way to go from "We know your coverage" to "Here's what you'll likely owe" - instantly, reliably, and based on real benefits data.
This is where the combination of Verification and Cost Estimate becomes powerful: verify that coverage is active, then immediately translate that into an estimated patient responsibility for a specific visit.
Quick Recap: The Two APIs Behind This Flow
Verification API
The Verification API confirms that coverage is active and returns standardized benefits, including things like:
- Copay
- Coinsurance
- Deductible and remaining deductible
- Out-of-pocket maximum and remaining balances
It's fully asynchronous, with webhook-driven updates and resiliency baked in.
Cost Estimate API
The Cost Estimate API uses verified coverage to calculate expected patient responsibility and payer-paid amounts, based on:
- The benefit accumulators returned by Verification
- The provider's contracted rate for each billing code
What This Flow Takes as Input
In this orchestration, we start with the inputs needed to run Verification plus the visit information needed to generate a cost estimate.
A reasonable flow input shape looks like this:
interface Patient {
  firstName: string;
  lastName: string;
  dateOfBirth: string;
  state: string;
  memberId: string;
}

interface CostLineInput {
  code: string;
  contractedRate: number;
}

interface VerificationToEstimateInput {
  payerId: string;
  placeOfServiceCode: string;
  specialtyCode: string;
  patient: Patient;
  providerTin: string;
  lines: CostLineInput[];
}
Chaining Verification and Cost Estimate
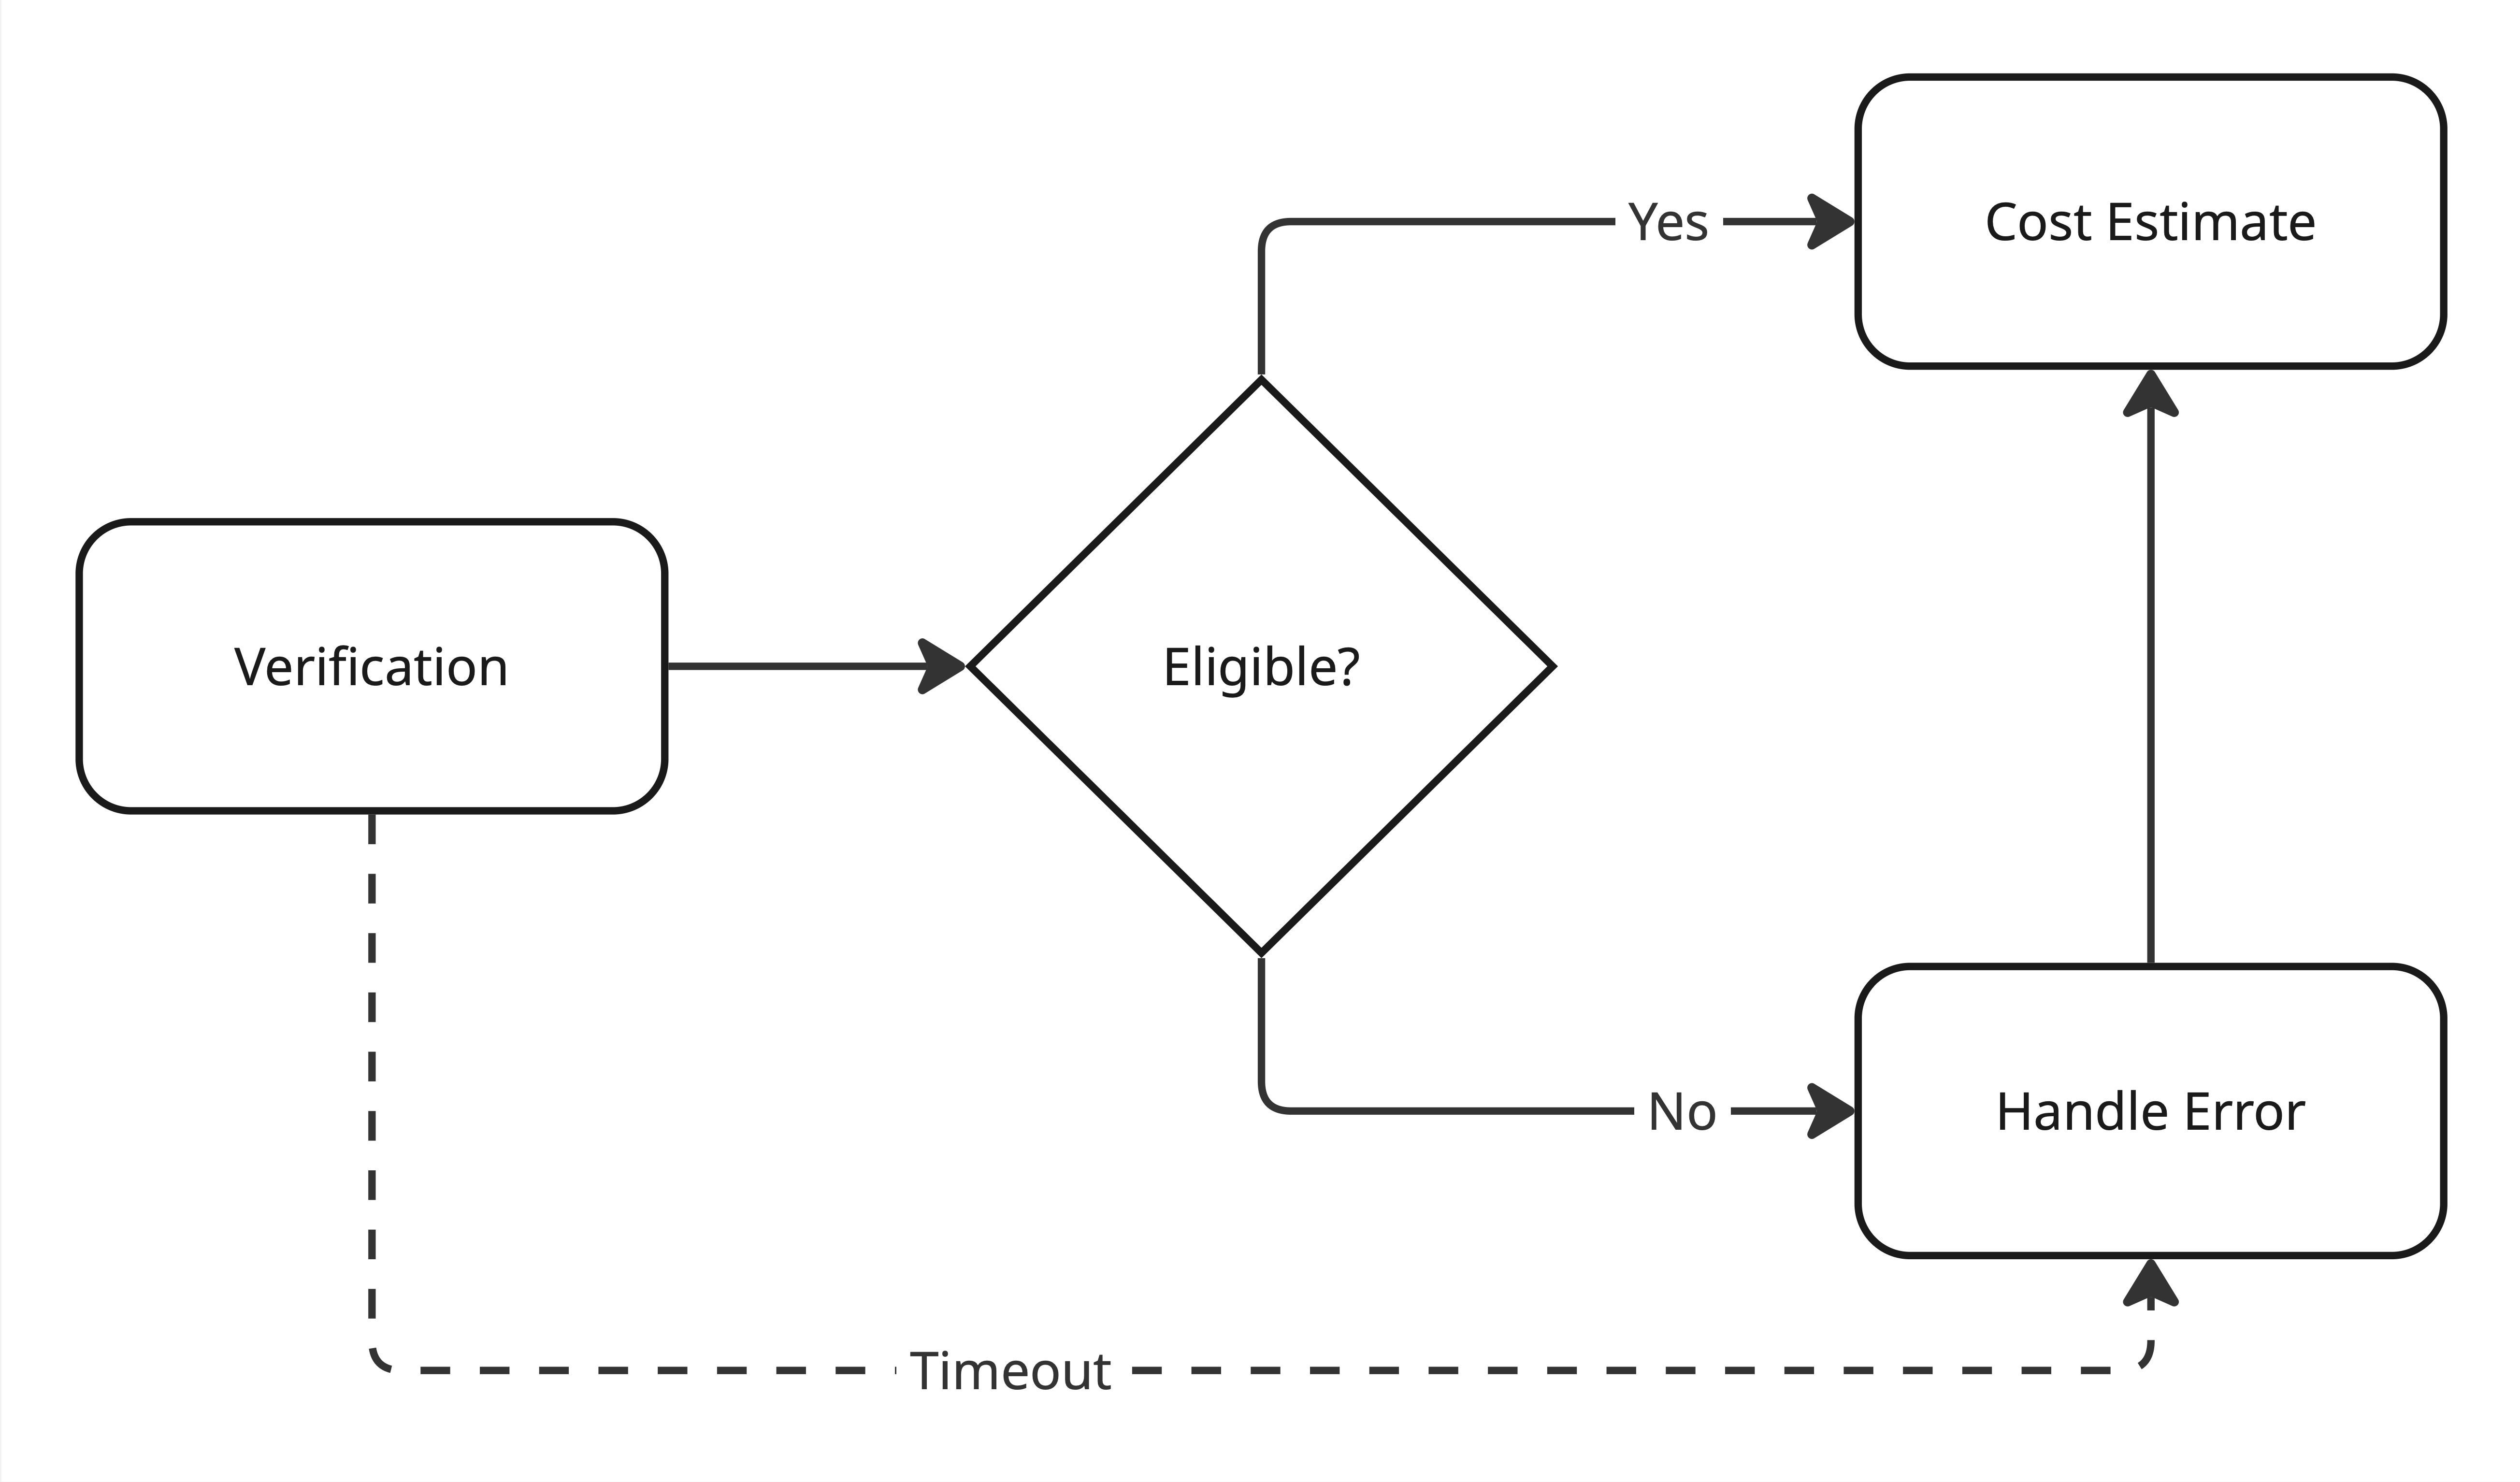
Below is a simplified orchestrator in TypeScript. In practice, you'll typically react to webhooks from Verification or poll the Get Verification API until a response is ready, but this sample shows the basic flow clearly in one place and assumes that a response is immediately available.
import axios from "axios";

const BASE_URL = "https://api.soharhealth.com";
const ACCESS_TOKEN = process.env.SOHAR_ACCESS_TOKEN;

const client = axios.create({
  baseURL: BASE_URL,
  headers: {
    Authorization: `Bearer ${ACCESS_TOKEN}`,
    "Content-Type": "application/json",
  },
});

interface CreateVerificationResponse {
  verificationId: string;
}

interface GetVerificationResponse {
  status: string;
}

interface CostEstimateResponse {
  requestId: string;
  paidAmount: number;
  patientResponsibility: number;
  // ...other fields
}

async function verificationToCostEstimate(
  input: VerificationToEstimateInput
): Promise<CostEstimateResponse> {

  const createVerificationRes = await client.post<CreateVerificationResponse>("/v2/verifications", {
    patient: input.patient,
    payerId: input.payerId,
    placeOfServiceCode: input.placeOfServiceCode,
    specialtyCode: input.specialtyCode
  });

  const verificationId = createVerificationRes.data.verificationId;

  const getVerificationRes = await client.get<GetVerificationResponse>(`/v2/verifications/${verificationId}`)

  const verification = getVerificationRes.data

  if (verification.status !== "complete.eligible") {
    throw new Error(`verification_failed: ${verification.status}`);
  }

  const costEstimateRes = await client.post<CostEstimateResponse>("/v1/cost-estimate", {
    verificationId,
    tin: input.providerTin,
    networkStatus: "inn",
    tier: 2,
    lines: input.lines,
  });

  return costEstimateRes.data;
}
In this example we take a typed input object, create a Verification request and retrieve a response. We can only proceed if the Verification status is "complete.eligible" - otherwise we throw an error. On success, we call Cost Estimate using the returned verificationId and lines from the input object.
We would also suggest implementing a timeout for the Verification response to limit the amount of time a patient is kept waiting. 30 seconds is a good threshold. The diagram below illustrates this workflow:
Choosing Representative CPT Codes by Specialty
To make these flows tangible, we need realistic CPT codes that represent an "average" visit for a given specialty.
These are a few examples:
- Psychotherapy: standard session lengths (45–60 minutes)
- Primary Care: common established-patient office visits
- Urgent Care: typical new-patient visit for straightforward issues
The goal isn't to model every edge case, it's to define a reasonable default set of codes that make instant estimating possible for the majority of visits.
Below, we'll reuse the same VerificationToEstimateInput shape for three example visits.
Example 1: Psychotherapy
90837 - 60-minute psychotherapy
const input: VerificationToEstimateInput = {
  payerId: "60054", // Aetna
  patient: {
    firstName: "Ava",
    lastName: "Rivera",
    dateOfBirth: "01/01/2000",
    memberId: "ABC12345",
  },
  placeOfServiceCode: "11",
  specialtyCode: "PSY",
  providerTin: "752326127",
  lines: [
    { code: "90837", contractedRate: 150 },
  ],
};
Example 2: Primary Care
99213 - Established patient office visit (moderate complexity)
const input: VerificationToEstimateInput = {
  payerId: "60054", // Aetna
  patient: {
    firstName: "Ava",
    lastName: "Rivera",
    dateOfBirth: "01/01/2000",
    memberId: "ABC12345",
  },
  placeOfServiceCode: "11",
  specialtyCode: "PRC",
  providerTin: "752326127",
  lines: [
    { code: "99213", contractedRate: 100 },
  ],
};
Example 3: Urgent Care
99203 - New patient visit, low/moderate complexity
87880 - Rapid strep test (or similar CLIA-waived point-of-care test)
const input: VerificationToEstimateInput = {
  payerId: "60054", // Aetna
  patient: {
    firstName: "Ava",
    lastName: "Rivera",
    dateOfBirth: "01/01/2000",
    memberId: "ABC12345",
  },
  placeOfServiceCode: "11",
  specialtyCode: "UGC",
  providerTin: "752326127",
  lines: [
    { code: "99203", contractedRate: 140 },
    { code: "87880", contractedRate: 35 },
  ],
};
These three examples give you a repeatable pattern: same flow input shape, different codes and contracted rates by specialty.
Presenting Estimates to Patients
Once you have a cost estimate, the next step is deciding how to show it. The UX can range from ultra-simple to very detailed, depending on the audience.
Simple, Consumer-Friendly Estimate
For many patients, all they want to know is: "Roughly how much will I pay?". A minimal UI might show a simple price point to indicate expected patient responsibility for an encounter. This works especially well for:
- Online booking flows
- Pre-visit reminders
- Front-desk scripts ("We estimate your responsibility today is…")
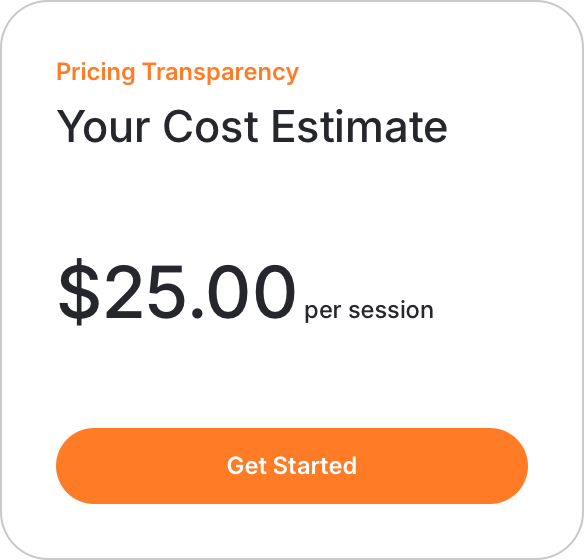
Always pair this with a clear disclaimer, to make it clear that final patient responsibility may differ after a claim is processed by the payer.
Detailed, Benefits-Aware Estimate
For more advanced users (billing teams, financial counselors, or patients who want specifics), you can present a breakdown that mirrors a remittance:
- Contracted rate per code
- Copay applied
- Coinsurance applied
- Remaining deductible / amount applied to deductible
- Amount applied toward out-of-pocket maximum
- Total patient responsibility
- Total payer responsibility
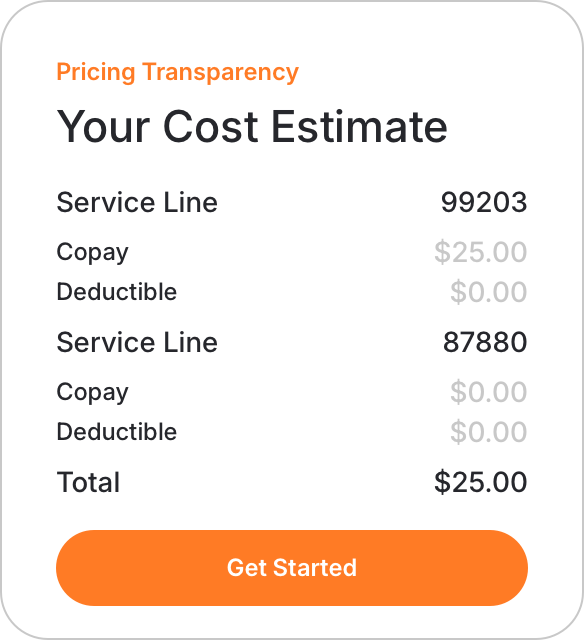
Again, always pair this with a clear disclaimer to make it clear that final patient responsibility may differ.
Why This Flow Matters
Coupling Verification and Cost Estimate moves you from "we know your coverage" to "we can show you what you'll likely owe" in one flow.
For patients, it creates a more modern, predictable experience. For providers, it accelerates cash collection, reduces surprises, and supports compliance with pricing transparency rules-without building a pricing engine from scratch.